Identify Supported Providers
Before implementing our Deductions APIs, make sure you identify providers that support the types of deductions and features your use case requires.Assisted vs Automated Integrations Deductions Support
You can identify which providers are automated and assisted using our Provider Network.Automated Integrations
- Both reading and writing are supported.
- Writing is performed near-real-time in the provider.
- Reading provides state of the system when the request is executed.
- No configuration period.
Assisted Integrations
- Only writing is supported.
- See Integration Types: Assisted for the most up to date SLAs for configuration period and data syncs.
Use the providers endpoint or field support matrix to identify provider that support your use case
The types and features of each deduction can vary between providers. Providers have varying limitations on which operations are available and which actions can be performed. Finch provides two tools to help you identify the types and features of deductions available for a given provider.- Providers Endpoint - The providers endpoint provides a list of all providers and the types of deductions they support.
- Field Support Matrix - The Field Support Matrix provides a list of all providers and the types of deductions they support, as well as the features available for each deduction type.
Prepare for provider limitations when creating company level deductions
Some providers do not allow creation of company level deductions using the Finch API (Create Deduction). Use the providers endpoint or field support matrix explained above to identify providers that do not support this for deductions. For those providers, you should confirm with the employer that the correct deduction is set up in their system prior to enrolling individuals through Finch. Then use the Register (assisted integrations) or Get All Deductions (automated integrations) endpoints to get thededuction_id for the company level deduction. Then you can enroll and update invidual level deductions.
If you try to enroll an employee in a deduction that is not set up, you may receive a 422 response code from Finch indicating that the deduction is not set up by the employer. In these cases, you should reach back out to the employer to ensure the deduction has been correctly set up.
Verify successful deduction job completion using jobs endpoint
For all deduction write requests, both automated and assisted, call eitherGET /jobs/{job_id} or the retrieve a manual job endpoint to check the job status and response body which will include a message with details about the cause of any errors.
Getting and Creating Company Level Deductions
Before your application can manage individual enrollments and updates for individuals, your system needs the Finchbenefit_id for the company wide deduction that the individual is or will be enrolled in.
The Finch Deduction API has three endpoints that return a benefit_id in the response body. For example, a creation request will respond with:
benefit_id to perform enrollment, un-enrollment, and deduction retrieval actions on individuals.
Your application can use the job_id and the Retrieve a Manual Job endpoint to get the status of the job. The valid job status responses will be either pending, in_progress, complete, or error with a response body further explaining the response.
Create Deduction, Register Deduction, and Get All Deductions are the endpoints that return a benefit_id to use for enrolling and updating individual deductions and contributions. Your application should use the appropriate endpoint based on if the connection is automated or assisted for deductions and if the deduction already exists in the provider system.
Enrolling and Unenrolling Individuals
Creating new individual enrollments
To enroll a new individual for a contribution or deduction, use thebenefit_id returned from the appropriate deductions endpoints above, and make a request to POST /benefits/{benefit_id}/individuals request.
This is a batch request endpoint. In the request body, you should provide a list of objects. Each object will specify the individual_id (from the directory endpoint in Organization), and a configuration object which specifies the enrollment configuration to applies to that individual
Use the API Reference to identify which fields should be included in the object for specific types of deductions. Note that none are required by our API, but the provider may require specific fields and return an error if they are not included.
Updating existing individual enrollments
To update the enrollment for currently enrolled individuals, use the samePOST /benefits/{benefit_id}/individuals endpoint that you use to enroll new individuals. When updating an existing enrollment for an individual, the enrollment configuration will be completely overwritten with the new configuration provided in the request, so please make sure to include the entire desired configuration. Since they both use the same endpoint, these update requests can be submitted in the same batch request as new enrollment requests.
Un-enrolling individuals
You can unenroll individuals by using theDELETE /benefits/{benefit_id}/individuals endpoint. This will remove the enrollment configuration for an individual.
Deduction Sequence Diagram
The following diagram shows the basic deductions flow. It can be used with either Register or Create endpoints to obtain the benefit_id. The flow is very similar for use with the Get All Deductions (automated integrations only) except that your application will need to handle a response with multiple benefit objects (see the API reference for response fields and examples).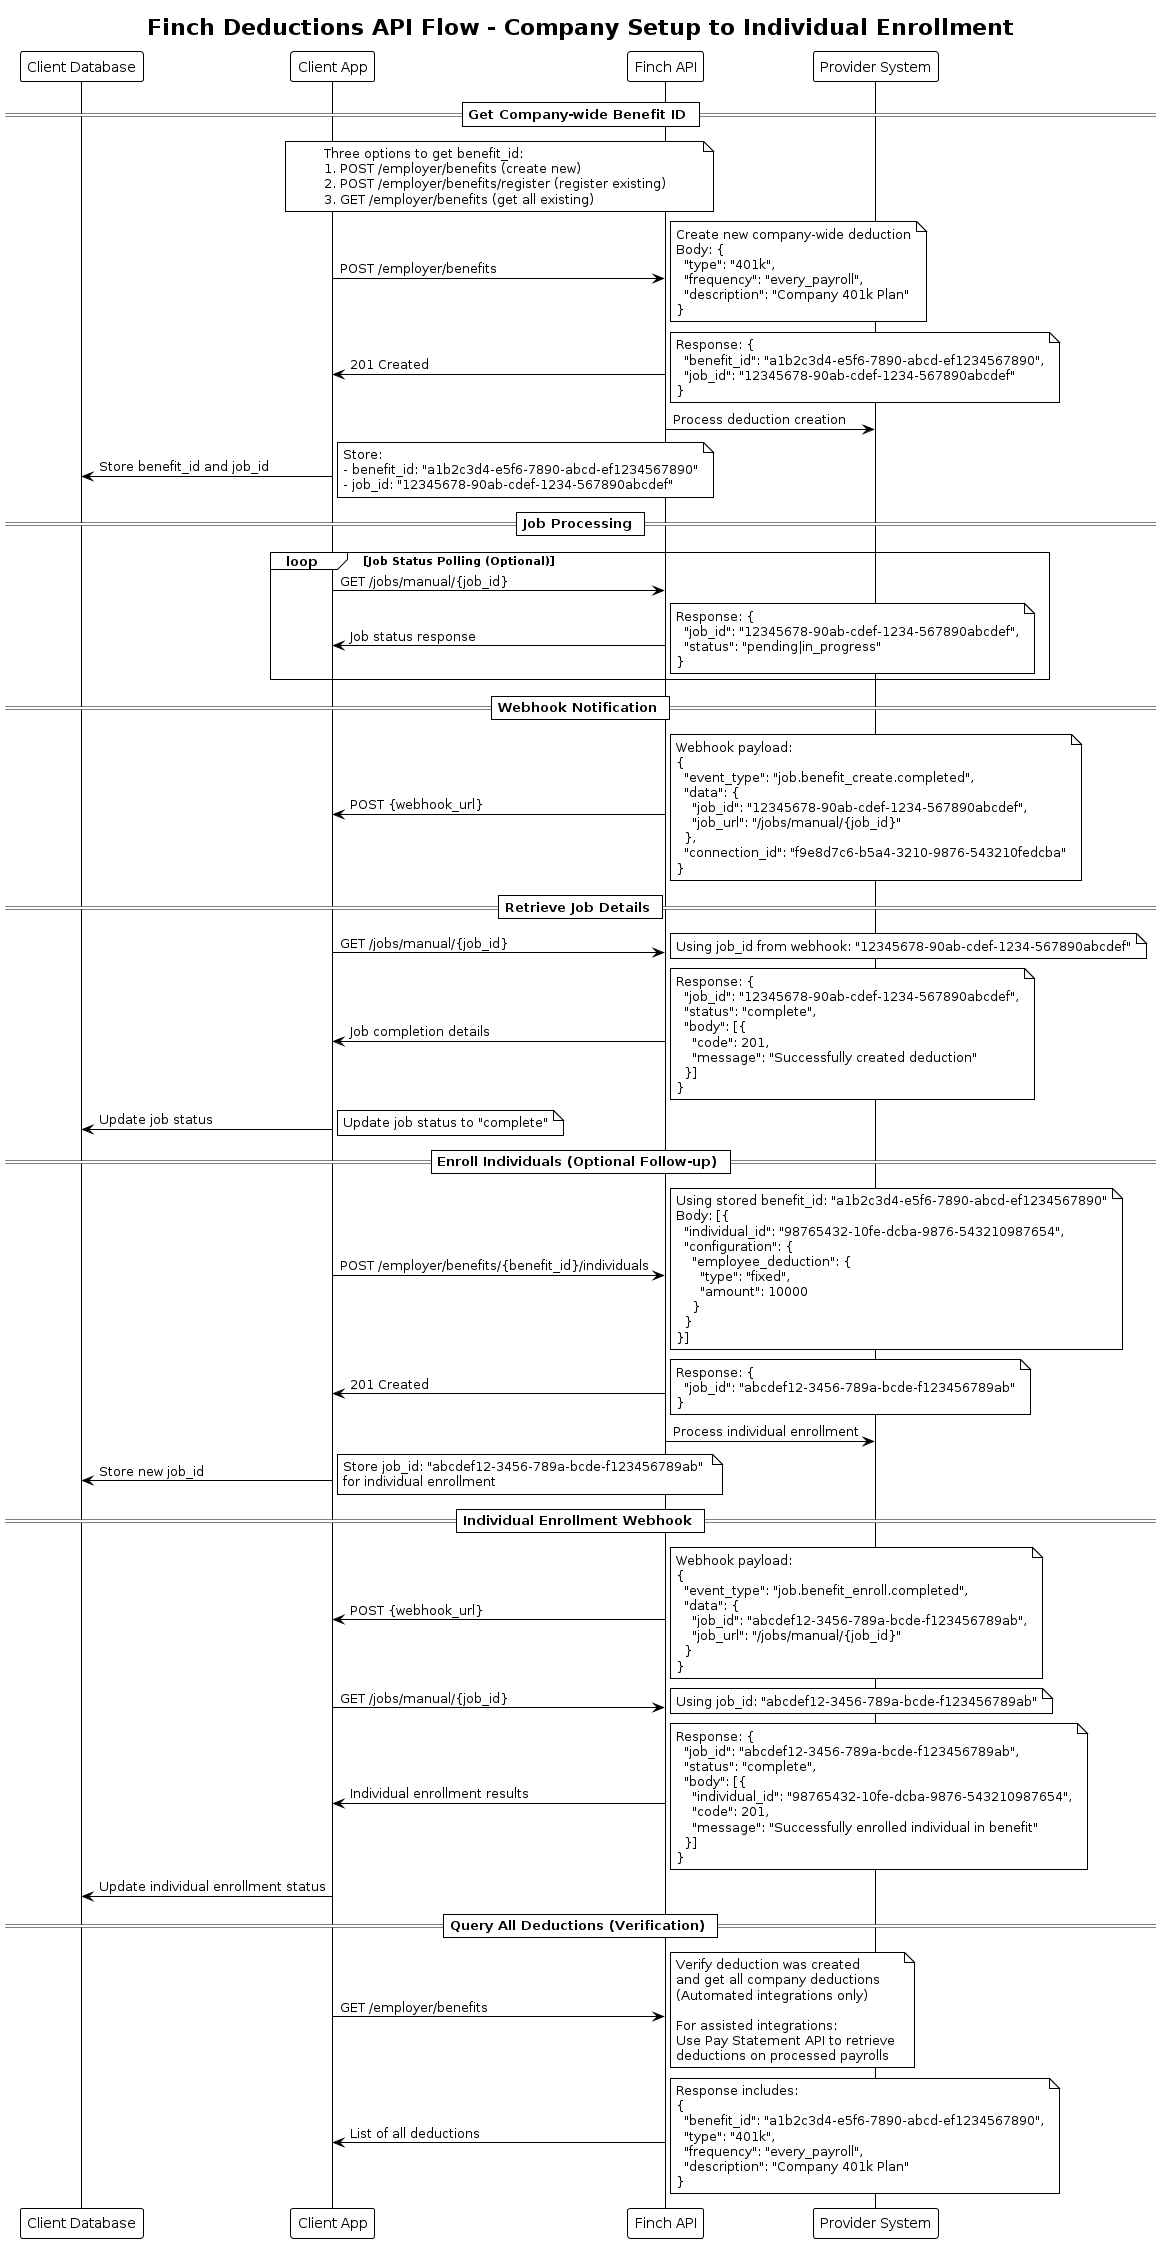
Handling Failures
Managing deductions and contributions is a time and money-sensitive activity. Therefore, in the unlikely event that a request through Finch fails, we recommend that your team have a process in place to handle enrollments or to inform employers. We recommend leaving adequate buffer between request submission via Finch and payroll cutoff dates to account for time to address issues. Our recommendation is that you submit a request with enough time to have at least 1 day between the response from Finch and the cutoff date. For an automated connection, that means submitting the request at least 24 hours before the cutoff. For an assisted connection, the recommended time is 3 days to account for the 2 day SLA. Enrollment and un-enrollment requests and responses are batched. This means that some enrollments/un-enrollments could succeed while others fail. For both automated and assisted integrations expect a job_id in the response body. You can use this job_id to get the status of the job and see which individuals were successfully enrolled or un-enrolled.Top-level
General Deductions Schedule
Since enrolling individuals in deductions and contributions can be a sensitive activity, it is helpful to understand some of the nuances around payroll in general.How do payroll deductions work?
Each payroll contains four important dates to know.- Payroll Start Date - The first day of the pay period
- Payroll End Date - The last day of the pay period
- Payroll Close Date - The last date to make changes for that pay period
- Paycheck Date - The date on which employees are paid
start_date, end_date, and the pay_date for past pay statements using our pay statement API, but our system cannnot provide the payroll close date. You will need to either get that information from the employer or set expectations for update based on their close date generically
Timing submissions
It is important to submit any employee deductions and contribution changes before the pay close date in order to take affect for the current pay period. If any changes are submitted after the payroll close date, they will only affect the next pay period, not the current. Since each payroll close date is different per provider, it is important to know this date and set proper expectations with your customers. For assisted connections, it is important to submit payroll deductions to our API 3 days before the customer’s payroll close date. This will help ensure that changes can be processed within the current payroll period (unless aneffective_date for a future payroll period is explicitly specified in your API request). Otherwise, the change will be executed on the next payroll period.
Effective Date
Theeffective_date parameter allows you to control when deduction or contribution changes take effect in an employee’s payroll. Use this parameter to schedule changes for an employee that will apply in future pay periods.
Effective date is not supported for Justworks or QuickBooks. It is supported for all other providers where Deductions is enabled.
How To Use Effective Dates
When you submit a deduction or contribution change with aneffective_date, Finch processes your request within 2 business days of the specified effective date.
Immediate Changes
- Scenario: You need a change to take effect as soon as possible.
- How to do it: Don’t specify any
effective_dateparameter. - What happens
- Finch submits the change to the payroll provider immediately for Automated providers, or within the 2 day SLA for Assisted providers.
- The change should be reflected in the current or next pay period, depending on the provider’s payroll cutoff date
Top-level
- Scenario: You want a change to begin on a specific date.
- How to do it: Set
effective_dateto a date more than 2 business days in the future. - What happens
- Finch schedules the change and submits it to the payroll provider on or up to 1 business day before your specified date.
- The change will be included in the pay period containing your effective_date. If that pay period has already closed by the time Finch submits the change, it will apply to the next available pay period instead.
- Your job will show a
pendingstatus until Finch submits it.
Top-level
- Effective dates in the past or within the next 2 business days will be processed immediately for Automated providers and within the 2 day SLA for Assisted providers.
- There is no hard limit on how far in the future you can schedule changes, but we recommend scheduling changes no more than 90 days in advance. The job will be stay in
pendingfor this duration.
- All changes are processed together as a group
- They follow the same timing rules as single requests:
- Historical dates: Submitted immediately
- Future dates: Scheduled and submitted on or shortly before the effective date
- No date: Submitted immediately
Tracking Request Status
Monitoring Scheduled Changes Use the job status endpoint to check on scheduled changes:Top-level
Understanding Request States
When you submit a change with a future effective date, you can check the status of that change via the manual job status endpoint:pending: The change is scheduled but not yet submitted to the providerin_progress: Finch is submitting the change to the providercomplete: The change has been successfully submitted into the payroll systemerror: Something went wrong (see error details for resolution steps)
Cancel or Modify a Request
Requests will remain inpending status until submitted to the provider. You can use the update or cancel endpoints to modify scheduled changes as long as the request is still pending.
Example
As an example, if the payroll period is June 1 - 15. The payroll close date might be June 16 so payroll can be processed before Tuesday, June 17. Therefore, it would be important to submit payroll deductions via the Finch API by June 11 for those to take effect during the June 1 - 15 payroll.
June 2022
Su Mo Tu We Th Fr Sa
01 02 03 04 05 06 07
08 09 10 11 12 13 14
15 16 17 18 19 20 21
22 23 24 25 26 27 28
29 30
Some payroll providers offer a dedicated payroll representative to help with making payroll changes. If a payroll rep is helping your customer’s HR admin with changes in their system, it is important that you make it explicitly clear who does what so that the payroll rep does not overwrite any changes Finch has previously made. Calling out Benefit Code types and using thoughtful descriptions (e.g. with your company name) help.
Best Practices
Do:
- Use future effective dates for planned changes like new hire benefits or scheduled contribution increases
- Omit effective_date for urgent changes that should apply as soon as possible
- Allow at least 2 business days lead time when scheduling future changes
- Monitor job status for scheduled requests to ensure they’re processed on time
- Check provider-specific behavior if you need precise timing guarantees
- Rely on retroactive processing for past effective dates - most providers don’t support this
- Specify effective dates within 2 business days if you need a guaranteed future date (they’ll be processed immediately)
- Assume immediate application even without an effective date - payroll cutoff dates may delay application to the next period
- Create a batch request with different effective dates
FAQs
Question Are all deductions requests processed First In First Out (FIFO)? Answer If requests do not include aneffective_date, the requests are processed in the order they are received. If you submit multiple requests for the same individual the last request processed will overwrite any previous requests.
For requests that include an effective_date, those enroll requests will be processed on the future effective_date rather than the order in which they are received.
Question What happens if I submit an enroll request for an individual who is already enrolled in a deduction?
Answer If you submit an enroll request for an individual who is already enrolled in a deduction, the existing enrollment will be updated with the new configuration provided in the request. The status of the request will be a 200 instead of a 201.
Question How does including an effective_date affect when the request is processed? For example, if for the same individual we submit multiple requests with different effective dates, will the requests still be processed in the order they are received or by effective_date?
Answer The effective_date parameter determines when the request is processed in the provider system. The request will be processed on the effective_date, which must be in the future. Requests should be batched by effective_date, and the order of processing will be based on the effective_date rather than the order in which they are received. If you submit multiple requests with different effective_dates for the same individual, the last request with the latest effective_date will overwrite any previous requests.
Question Is the effective_date that is included in the request, the date that is input into the provider’s system?
Answer For assisted integrations The effective_date that is submitted will be entered into the provider system if the provider has the capabilities to ingest a future effective date and the date is within the allowed range. In case the provider does not have this capability, we will apply the change on the effective date. Note that effective_date is not supported across all providers, some do not accept past effective dates, and some have a limited future window for dates.
For automated integrations, we apply the changes on the effective date and do not enter an effective date into the provider system.
You can expect that the enrollment will be effective for the pay period that the request is processed if it is processed before the close date of that pay period. Include an effective_date in a future pay period if you want the enrollment to be effective for that pay period.
Why Job Verification Matters
When you create or register a company-level deduction, Finch returns both abenefit_id and a job_id immediately. However, this does not mean the deduction has been successfully created in the provider system yet. The job may still be processing (pending or in_progress status), or it could complete with an error.
Understanding Job Status: A critical distinction exists between job completion and job success:
status: completemeans the job finished processing—it does NOT guarantee success- You must call GET /jobs/manual/ and inspect the response
bodyfor errorcodeandmessagefields to determine if the job actually succeeded - Common failure scenarios include: provider validation errors, missing required fields, duplicate deductions, or provider system issues
- Polling: Repeatedly call GET /jobs/manual/ until
statuschanges tocomplete, then examine the response body. This is not recommended. If you opt to use the approach we recommend polling every 1 hour for automated integrations and once per day for assisted integrations. - Webhooks: RECOMMENDED Subscribe to the job completion webhook event job.benefit_*.completed to be notified when the job completes, then call GET /jobs/manual/ to examine the response body
benefit_id to enroll individuals before confirming the company-level deduction job succeeded, you’re submitting enrollment requests for a deduction that may not exist or may have failed to create. These enrollment attempts will be queued as jobs, but they will all fail because the underlying benefit_id is invalid.
Handling Failures: If the company-level deduction register or create job completes with an error:
- Review the
codeandmessagein the response body to understand what went wrong - Alert appropriate personnel (e.g., log the error, notify your support team, or surface the error to the user) so the issue can be addressed promptly
- Correct the issue in your request (e.g., fix validation errors, adjust deduction configuration)
- Submit a new Create Deduction or Register Deduction request
- Finch will not automatically retry failed jobs—you must handle retries in your application
benefit_id, you must:
- Detect that the original deduction creation failed (by finally checking the job body)
- Retry creating the company-level deduction with corrections based on the error message
- Track which individual enrollments failed
- Retry all failed enrollments with the new
benefit_id - Handle any individuals whose status may have changed during this process